I want to help you build a sustainable, profitable handmade business that makes you consistent income and sales. I only ever teach or recommend marketing, social media, pricing, production and branding tips that I’ve personally used successfully in my own 7-figure handmade businesses.
I'm Mei, from Los Angeles!
Read More
Popular Posts You'll Love
Looking for something?
Categories
starting a business
get more traffic
running a business
make more sales
branding
growing a business
mindset & productivity
podcasts
pricing & money
product photography
reviews
selling on etsy
selling on amazon
social media
selling wholesale
- Facebook0
- Twitter4
- Pinterest12
- 16shares
Amazon FBA is an untapped goldmine for us handmade sellers and today I’m going to show you how to get started with just 5 simple steps.
If you’ve been around the blog for a while, you’ll know that I started selling my own handmade jewelry on my website at tinyhandsonline.com. I was also selling my products over on regular Amazon (not handmade) and I was actually doing pretty well, considering I didn’t do anything more than publish my product listings. But a friend of mine who was running a very successful makeup business told me that I had to get on Amazon FBA. I took her advice almost instantly, saw an immediate increase in sales to the point where my team and I were getting maxed out and almost couldn’t keep up between Amazon and my own site orders!
For those of you who don’t know, FBA is Amazon’s fulfillment service and stands for “Fulfillment by Amazon”. The way it works is you pay Amazon a bit of an extra fee, and in exchange, they take care of your storage, packaging, shipping, returns, and customer service!
All you need to do is ship them your products in bulk and they’ll take care of the rest.
Now, you may be thinking: “Do I really need to pay Amazon all that extra money? Can’t I just stick with regular Amazon and take care of my own packing and shipping?”
Sure, you could.
At first, I was selling on regular Amazon, and I was already getting some pretty consistent sales without doing anything more than getting my listings up and making sure they were keyword optimized and had decent product photos.
But Amazon FBA is so much more than just a fulfillment service.
More than Just a Fulfillment Service
When you start selling with FBA, all your listings will get the trusty Amazon Prime label, which will let your customers know that they get Free Two-Day Shipping when buying one of your products.
Personally, I rarely buy anything that isn’t prime. The label alone will give you such an increase in sales, that it will far outweigh the costs of Amazon FBA.
Also, you’ll rank a lot better in search results than your competitors because Amazon prefers to promote FBA products over Non-FBA products.
The better you rank, the more sales you’ll get.
Just head over to Amazon and search for any product and you’ll notice that most of the products on the first page are going to have the Prime label.
But my favorite thing about Amazon FBA by far is the flexibility and freedom it gives me.
I love that I only have to ship Amazon one large package with all my inventory and not have to worry about shipping individual orders or dealing with customer service. I can literally go on vacation and keep making sales with Amazon FBA.
I also like that I can hand off the logistics part of my business to someone who’s way better at it than me and instead focus on my craft and growing my business, which is what I do best and what I enjoy doing.
The Investment
So how much of an investment is Amazon FBA going to be for your business?
Well, if you’re already a regular seller on Amazon, then you know about their monthly subscription fee and their referral fee on every sale you make. Now if you decide to upgrade to Amazon FBA, you’ll be paying two additional fees: one for storage and one for fulfillment.
The inventory storage fee is a monthly payment to keep your products safely stored inside Amazon’s warehouses. You’ll pay by the cubic foot, and it’s actually pretty affordable. Especially if you make smaller products like jewelry, wallets, or notebooks.
The fulfillment fee is what you pay Amazon on every single order. It covers everything that goes into fulfilling an order such as picking, packing, shipping, and even customer service and returns processing in most cases. These are calculated per unit, so if you ship 3 products, you’ll be paying a separate fulfillment fee for each one.
Storage Fees
Your fees will depend on how much your products weigh and how big they are, but to keep things simple Amazon has split its product sizes into two main categories: Standard size and oversize.
Standard size would be any product that weighs less than 20 pounds when packed and is no larger than 18” x 14”x 8”, while anything larger or heavier is considered oversize.
Unless you’re selling heavy furniture or something like that, it’s pretty safe to say that most of our products will fall into the standard size group.
When it comes to storage, the latest FBA price for standard-sized products is 75 cents per cubic foot from January to September and $2.40 per cubic foot from October to December, because those are the busiest months in online shopping. They do provide discounts if you decide to pay annually or bi-annually.
To give you an idea of my costs, I roughly spend less than $5 per month on storage, which allows me to keep around 60 units of jewelry in Amazon’s warehouses, ready for shipment. It’s really fairly priced.
Fulfillment Fees
Fulfillment fees are also pretty simple to grasp. For Standard-sized products, Amazon charges anywhere from $2.50 to about $12.00, depending on how much it weighs.
The only other cost you’ll need to think about is the bulk shipping of your products over to Amazon. So if you’re shipping 100 products over to Amazon, you can just divide the cost of your shipment by 100 and that’s how much you’re spending per product.
For every product you’re selling, you’ll need to factor in your initial stocking fee, Amazon’s usual referral fee, and an extra fulfillment fee for Amazon FBA.
Now, I can’t say exactly how much that’s going to be for you, but in my case, I’m usually paying Amazon around 30% of my product price in fees.
This may seem like a bit of money at first, but if you’re pricing your products correctly, you should have no problem making a good amount of profit from Amazon, despite the extra FBA fees. If you don’t know how to price your products, you should definitely check out my pricing handmade products playlist for a few videos teaching you how to do that.
If you’re just excited as I am about Amazon FBA and what it can do for your handmade business, then here’s how to get set up in 5 simple steps.
Step 1 – Pick Your Products
Before you get started with Amazon FBA, you’ll want to pick out which of your products you’re going to send them. Assuming you’re already on Amazon as a regular seller, you can just pick your best selling products to get started. Or you can even pick a few bestsellers from your Shopify or Etsy shop. The idea is to start off with a proven set of products if you can.
Step 2 – Set Up Amazon FBA
Once you’ve picked your products, getting started with FBA is the easiest thing. Assuming you’re already an Amazon seller, all you need to do is convert your products to FBA. You do this by heading over to the “Manage Inventory” page, which is where you’ll find all your products. From there, you want to click on the “Edit” dropdown menu next to each product and select “Change to Fulfilled By Amazon”.
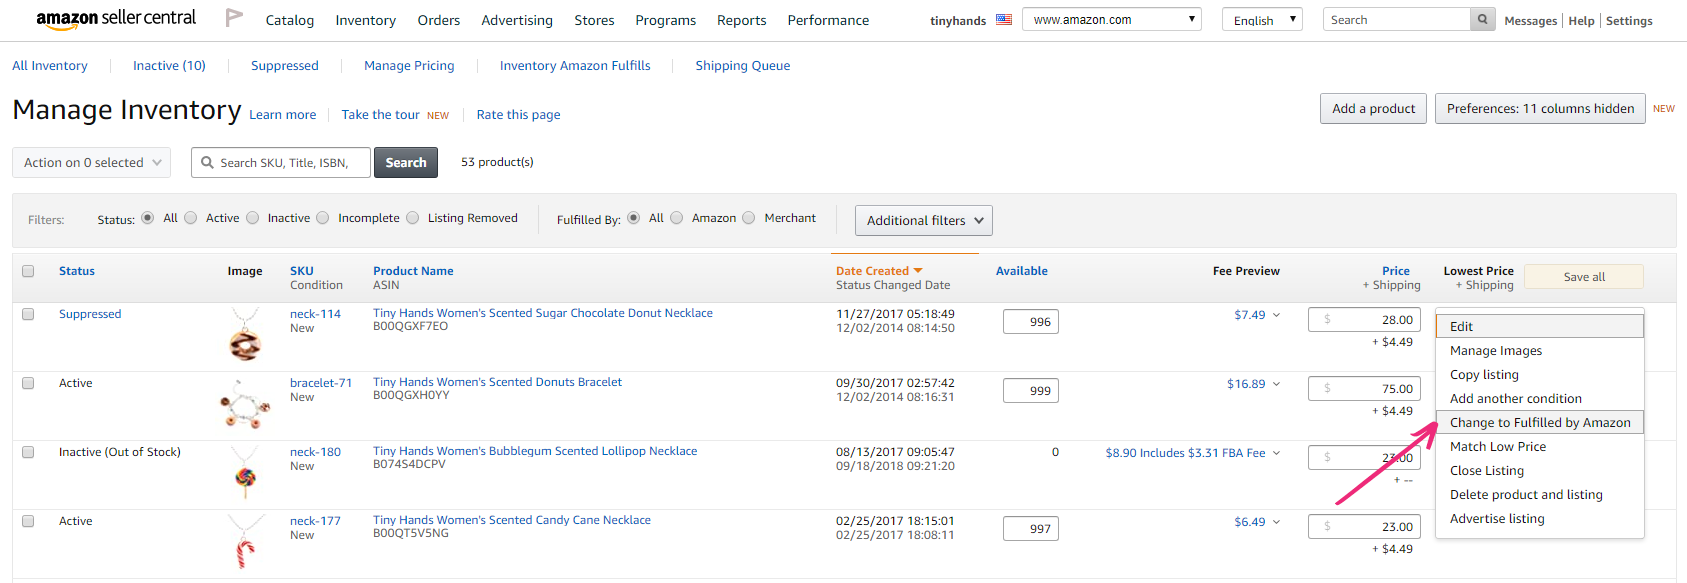
This means you’re asking Amazon to take care of fulfillment for this product from now on, instead of shipping it yourself. It’s then going to ask you whether you want to “Convert & Send Inventory” or “Convert only”. If you have more products you want to sell with FBA, you’ll want to select “Convert only” and repeat this process with all the products you want to sell using FBA.

These items are now going to be found in your FBA inventory and no longer in your regular inventory. Not to worry, you can always change them back if you decide you no longer want to sell an item using Amazon FBA.
Now that you’ve converted all items you want to sell on FBA, you can select “Convert & Send Inventory”, which will prompt you to first mark whether your products should be categorized as dangerous goods like if it includes batteries or hazardous material. Click “no” for both if they don’t apply to you.
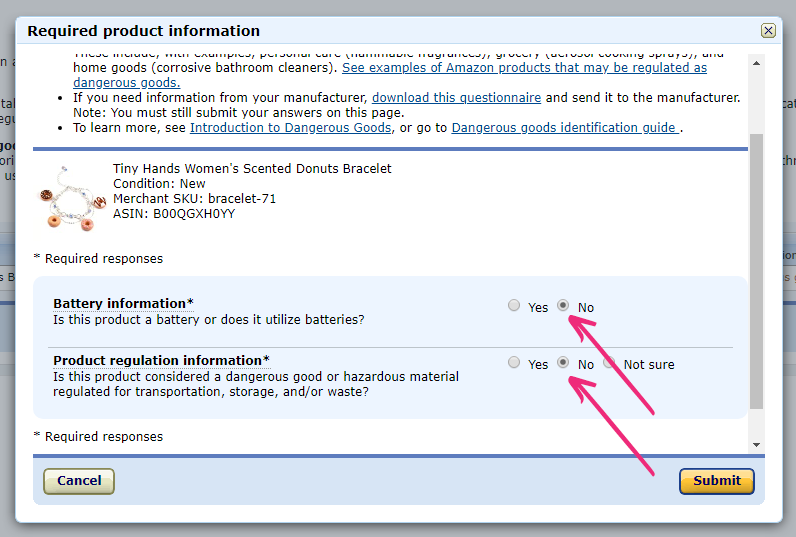
Step 3 – Create a Shipping Plan
Next, you’ll want to select create a new shipping plan.
For this you’ll need to insert the address you will be shipping your products from, which is most likely going to be your home or business address. Next, you’ll want to select your packing type.
There are two packing types: “Individual products” and “Case-packed products”. If you’re sending different types of products, you’ll want to select “Individual products”. Only select “Case-packed products” if you’re sending a box with all the same exact type of item in it. For example, a box of 50 cupcake necklaces.

Once you’ve set up a shipping plan, you will be prompted to add your items from your Amazon FBA inventory. Assuming you’ve already converted all the items you want to sell, you should see them all listed here.

All you need to do here is enter the units for every product you want to ship to Amazon.
Step 4 – Ship Your Products!
Now that you’ve added all your products to your shipping plan, you can finally ship them to an Amazon warehouse. To do this, head over to “Manage FBA Shipments” and then click “Continue with shipping plan”.

You’ll be asked a few questions for how you want to ship, as well as give you the address to ship to. If you’re shipping a lot of products, they might ask you to ship to separate warehouses.
Lastly, you’ll need to select whether you or Amazon will label the product. I usually label my own products using inkjet Amazon labels I get from, you guessed it, Amazon. They’re just regular 1 x 2 ⅝ “ labels. Amazon will give you a PDF of the actual labels to print and apply to your products before shipping it out to them.
This is how Amazon knows what each product is, and they’re sending the correct items to their customers.
Step 5 – Ship Your Products
Once you approve your shipping plan, you’ll have the option to purchase shipping directly from Amazon. You just need to know how much your package weighs. You can either put it on a bathroom scale or just estimate based on the individual weight of your products.
Make sure your products are well packaged and Amazon will then give you a printable label for you to stick on your package and they’re ready to mail! Just drop them off at your local UPS.
That’s it! Once your products arrive and get checked in at the fulfillment center, they’ll immediately become available for your customers to purchase. This means no more packing, shipping and customer service duties for you, and a lot more profits for your business!
How awesome is that?!
All you need to do now is keep track of your inventory and keep on restocking whenever you start running out.
Leave a Comment
Liked this article? Share it!
Unlock a Profitable Handmade Business
in Just 12 Weeks Without Using Etsy
or Social Media
FREE WORKSHOP
This workshop is for anyone who makes and sells a handmade or physical product, including jewelry designers, artists, paper designers, bath & body product makers and more!
What You'll Discover
The #1 mistake people make with Etsy & social media that causes shops to FLOP
The secret to making it with your handmade shop so it's no longer just a hobby
How to make sales in your handmade shop with ease so you can finally get to 6-figures
TAKE ME THERE
Your email address will not be published. Required fields are marked *
Leave a Reply Cancel reply
About
Blog
A Sale A Day
Student Login
Free Class
Contact
Terms
Become A Student
Watch On YouTube
Student Reviews
See My Handmade Shop!



You’re doing a fantastic process Man, Keep it up.
Amazing write up! Thanks for this submit
Great percentage! This submit may be very beneficial.