I want to help you build a sustainable, profitable handmade business that makes you consistent income and sales. I only ever teach or recommend marketing, social media, pricing, production and branding tips that I’ve personally used successfully in my own 7-figure handmade businesses.
I'm Mei, from Los Angeles!
Read More
Popular Posts You'll Love
Looking for something?
Categories
starting a business
get more traffic
running a business
make more sales
branding
growing a business
mindset & productivity
podcasts
pricing & money
product photography
reviews
selling on etsy
selling on amazon
social media
selling wholesale
- Facebook6
- Twitter2
- Pinterest124
- 132shares
If you’re a handmade business owner and you don’t have a Facebook page yet, get one set up right now because you’re missing out.
Facebook is the best social media platform out there. In this video, I’m going to share with you how to set up your own Facebook business page in less than 10 minutes.
Hi, my name is Mei Pak and I help makers, artists and designers make a consistent income by selling their handmade products online. I’m going to show you step by step how to set up your Facebook business page.
The Basics
The first thing you’re going to do is go to your homepage for Facebook. There are quite a few ways for you to create your page.
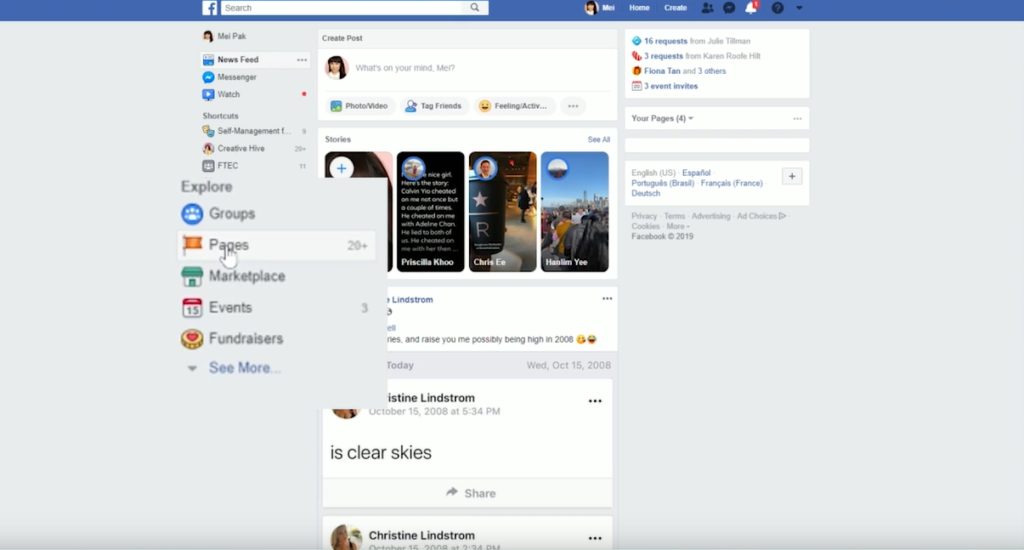
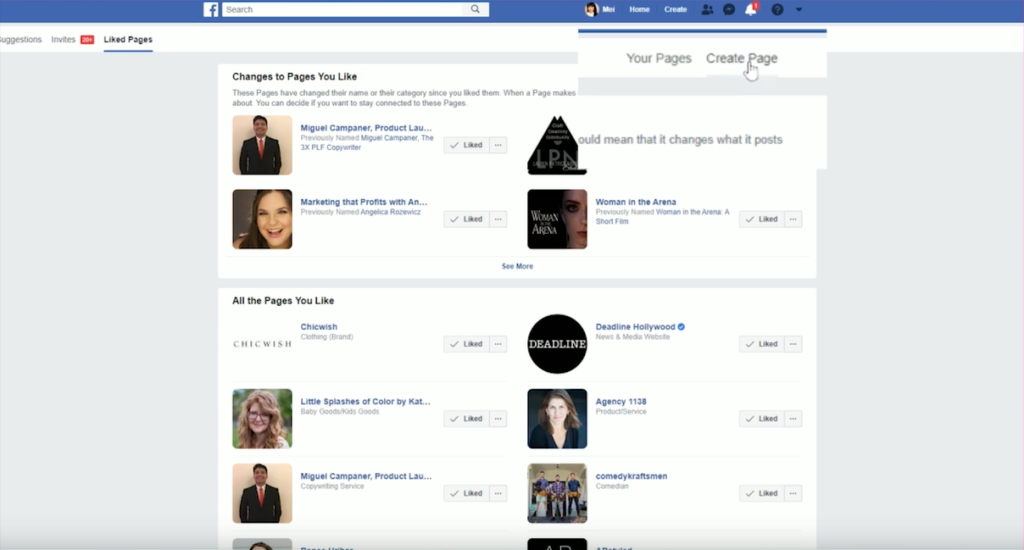
One way is on your left-hand sidebar, you’ll see a link to pages. Click on that and then on the top right you’ll see the link to create a page.
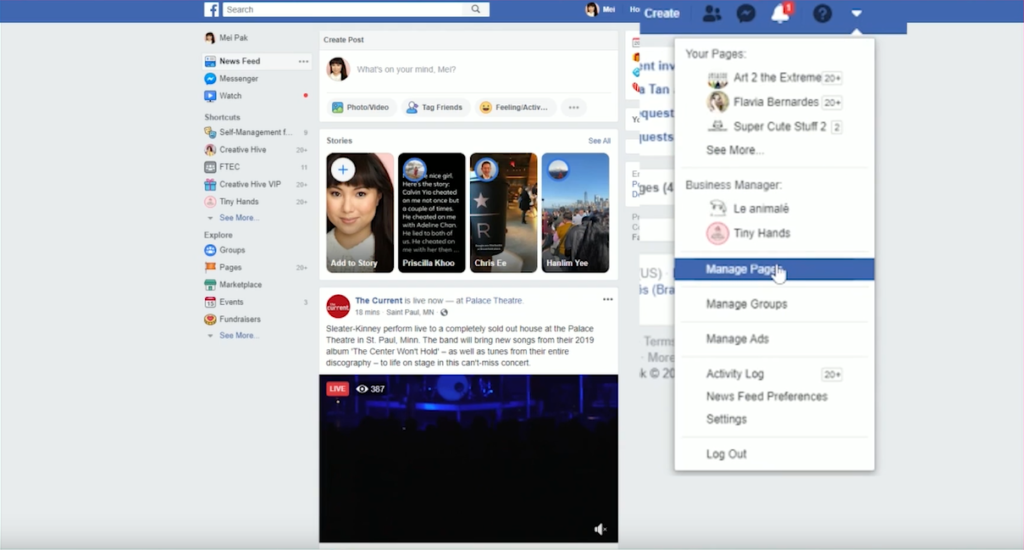
The other way to do it is to click on the bottom down arrow button and then click on manage pages.
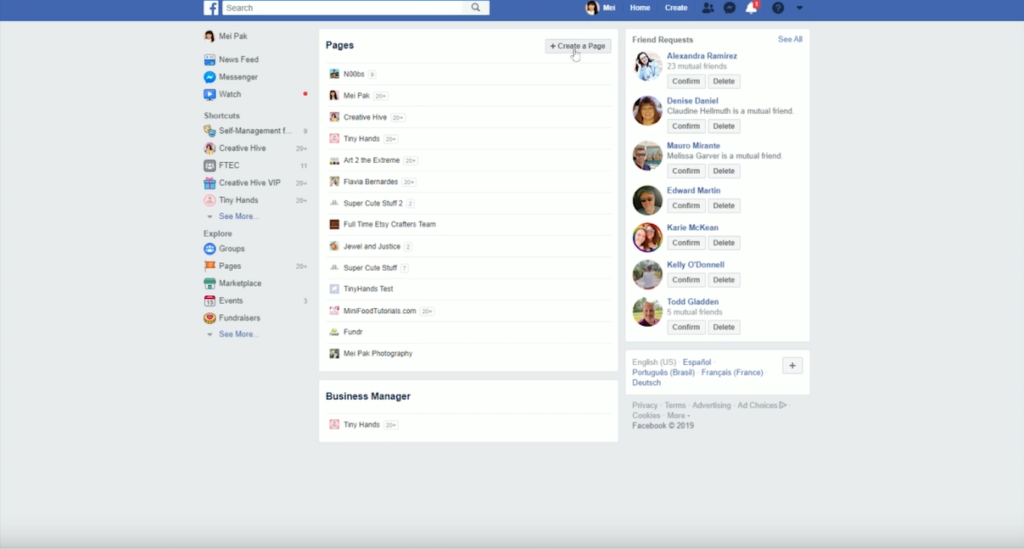
There’ll be a button here to create a page – click on that.
On the next page, most likely, you’re a business and not so much a community or public figure.
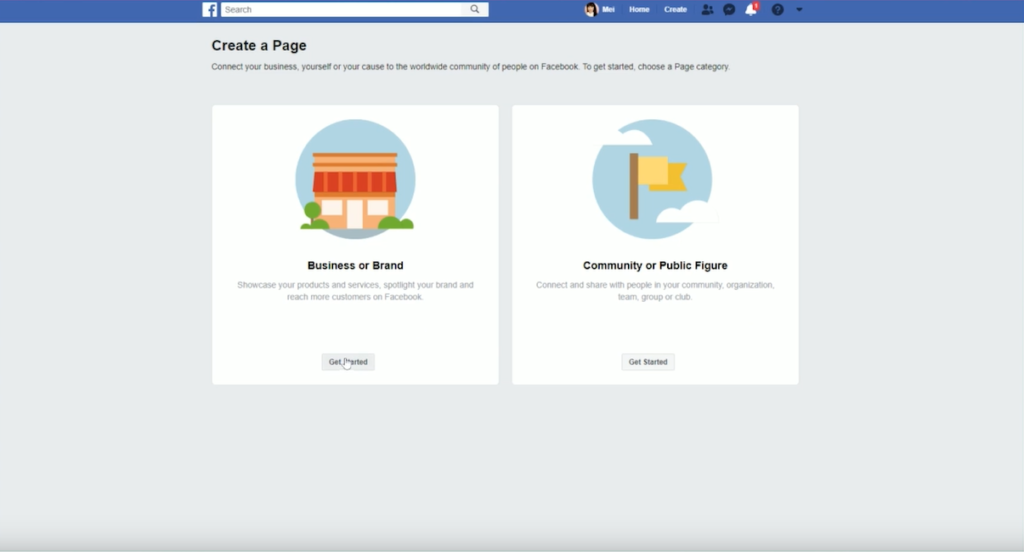
It doesn’t matter so much what you pick here. Depending on what you choose, some options will become available to you that are more appropriate for a public figure compared to a business or brand for example.
Click on get started under business or brand then fill in all of the information that is prompted.
For categories, most of us are going to fall under shopping and retail.
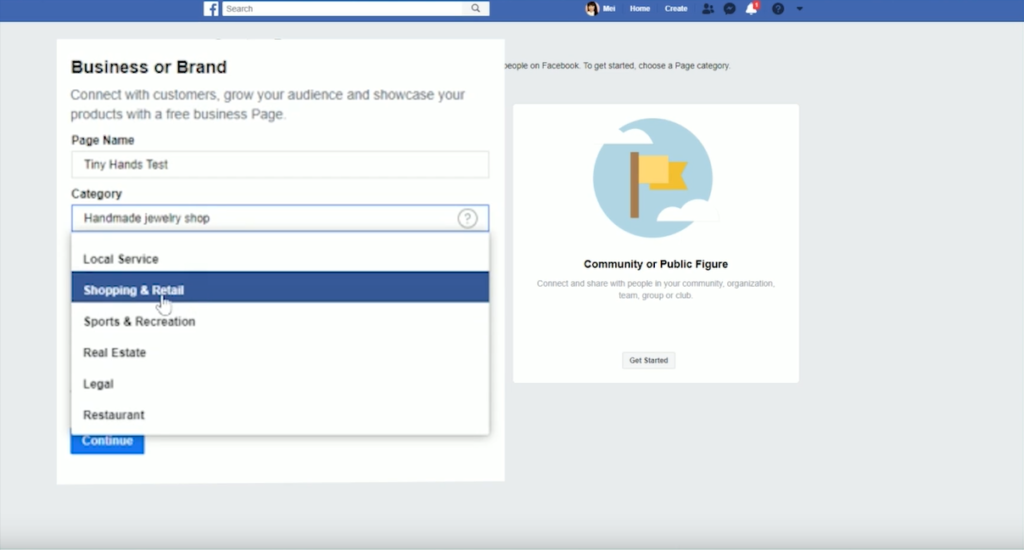
Don’t worry about inputting your address. You don’t have to show that publicly. Check the “don’t show my address” box and it will hide it from your profile. You can leave phone number blank, if that’s your preference.
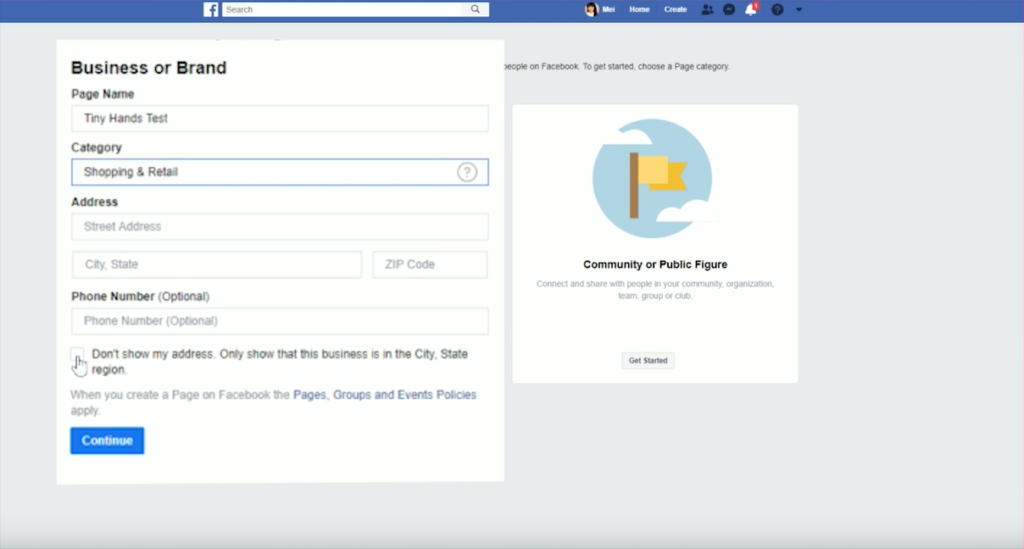
When you’re done with that click on continue.
Setting the Look
Our next task is to upload a profile picture.
For your profile picture I recommend that you upload your business logo.
If, however, you are a business where you yourself are at the forefront of your business, then upload a picture of yourself.
Try to keep your logo square because that is what is going to show up on your Facebook page.
Your cover photo is the big banner at the top of your Facebook page.
So I’ve designed my cover photo using Canva. It’s free to use and what’s really nice about it is you don’t have to worry about the exact dimensions that your cover photo should be. Canva has already created a template for you so when you select the cover photo option it will already be pre-loaded with the exact dimensions that you needed to be.
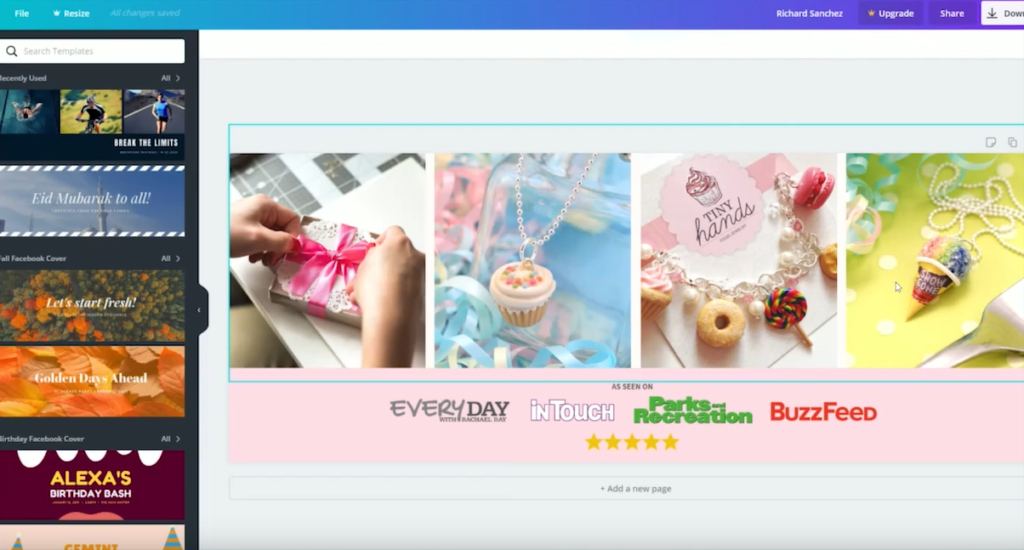
Plus they’ll give you some pretty cool options for kind of template designs that you can start with and that’s exactly what I’ve used in my example.
Choosing a Username
The next thing that I recommend for you to do is to change your username.
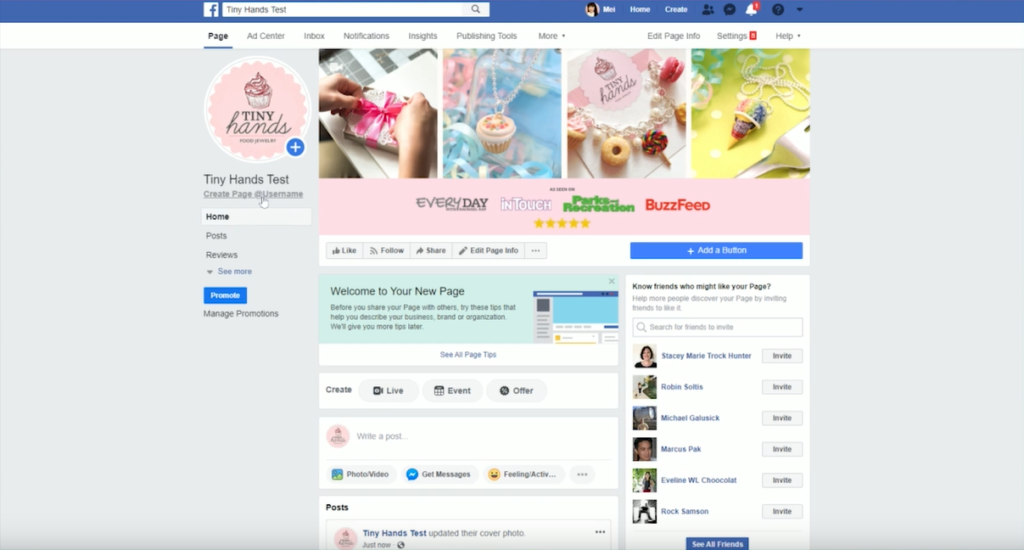
So, if you’re familiar with Facebook, you’ll know that you can tag a person in your posts. For example, I can do @tinyhands and the drop-down will show you options for who you can tag.
When you tag someone that business or person will be notified that you tagged them. What I recommend for you to do is just use your business name for this.
So if my page was Tiny Hands I would just use @tinyhands. If that isn’t available, then I might say @tinyhandsjewelry.
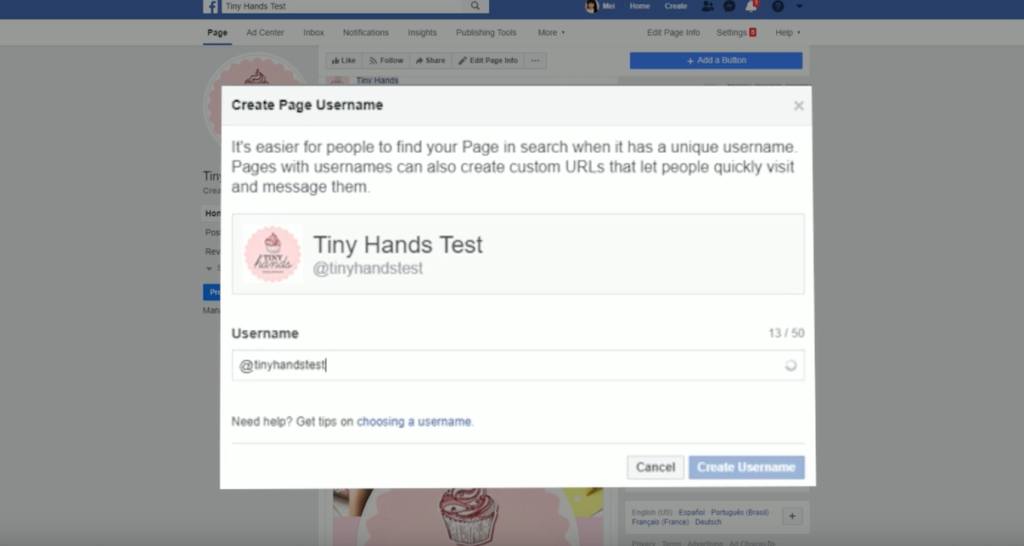
Just add possible words that might help describe your business and try to avoid being vague and abstract with any additional words that you add on to your username.
I also think of choosing your username in the same line as choosing your domain name. You want to avoid making it too complicated (like putting in numeric numbers, hyphens, or underscores) because it’s difficult for people to remember.
When you’ve chosen a username you’re happy with, click on create username.
The Details
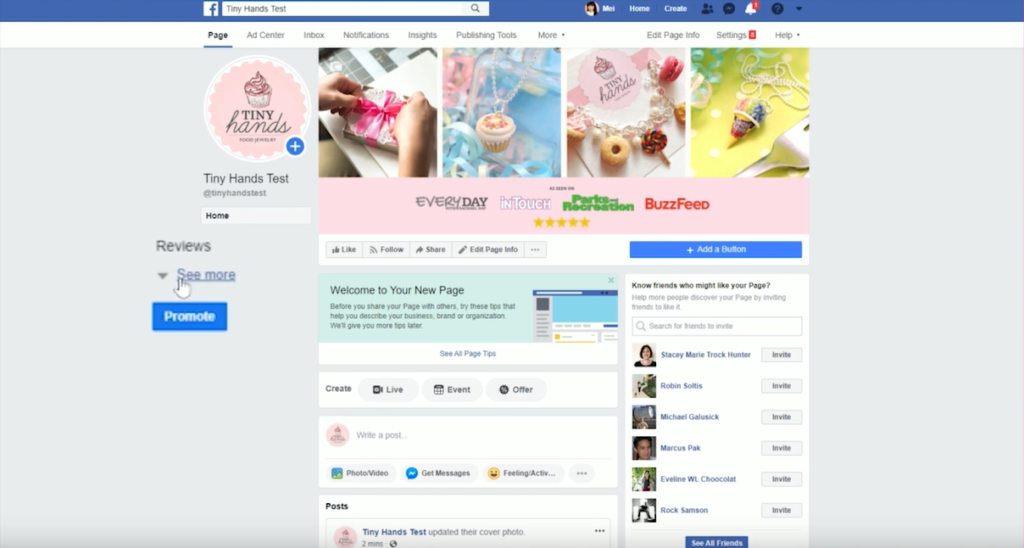
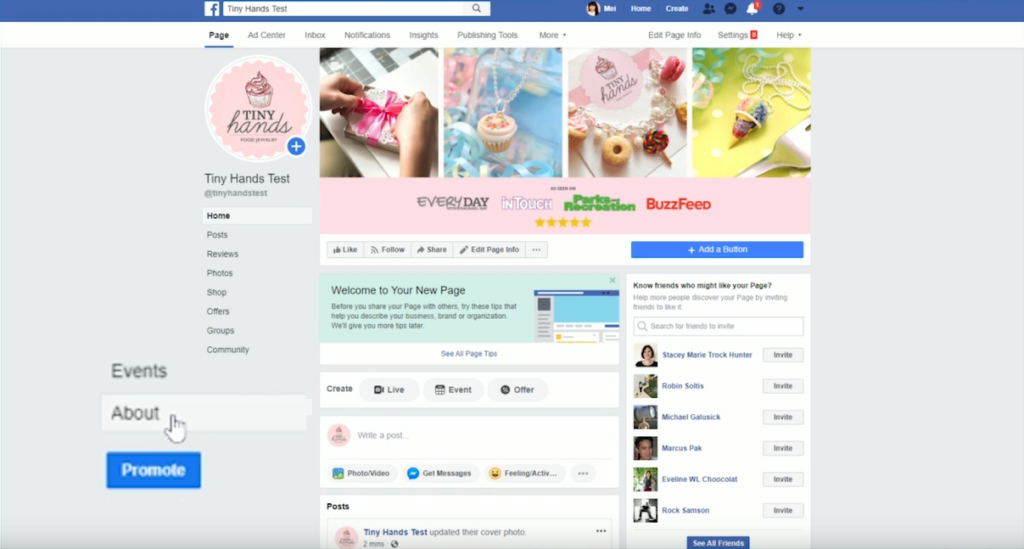
Next thing, click on “See More” option over here and click on where it says about. I recommend that you fill in as much of all of this information as possible.
Whatever information you don’t fill in will not appear on your page. So if you don’t put in your email address or your website, it’s not going to say there isn’t any email information, it’s just not going to appear.
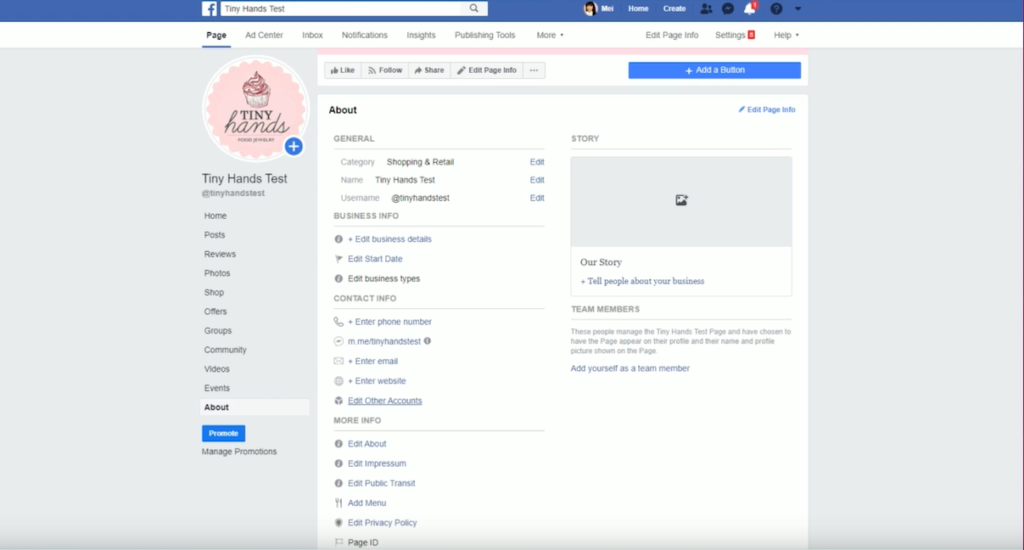
I do think it’s a good idea to put in your email address, website, and all your other social media accounts just to make it easy for people to find you.
If you’re doing your Facebook marketing well and your posts are grabbing people and they’re coming over to your profile, they might check out your about page just to figure out more about who you, what you do, and what your business is all about.
You want to fill in this information as much as possible.
You can just grab parts of your existing about information that’s already on your website and put that in here.
For sure you want to put in your email address and your website. That’s the whole point of doing social media is to get people back over to your website so they can shop with you.
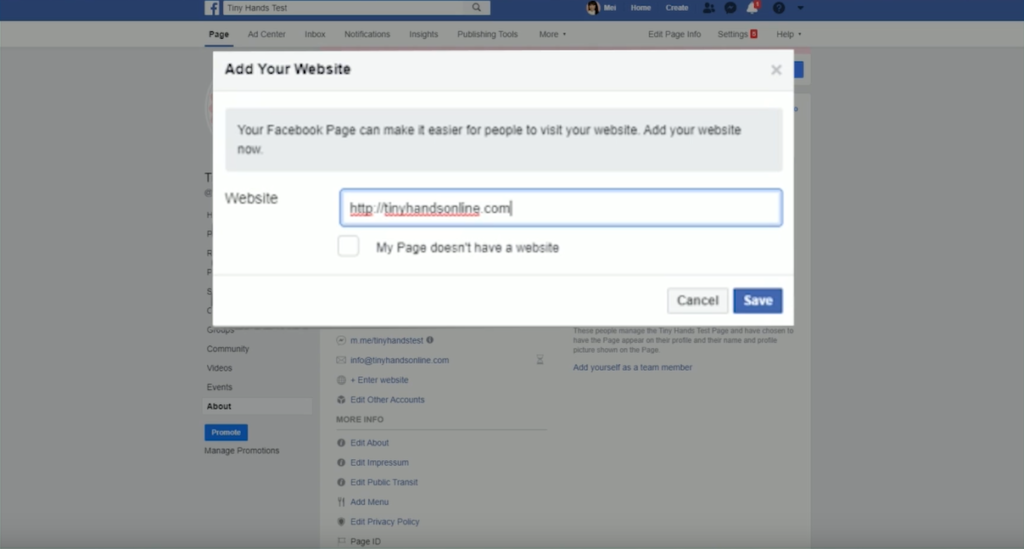
Then in your own time, you can fill in your about information and your business details.
You can also add yourself as a team member. Not a lot of pages do this. It’s really just a personal preference. It’s not going to make or break anything if you do decide to do this or not.
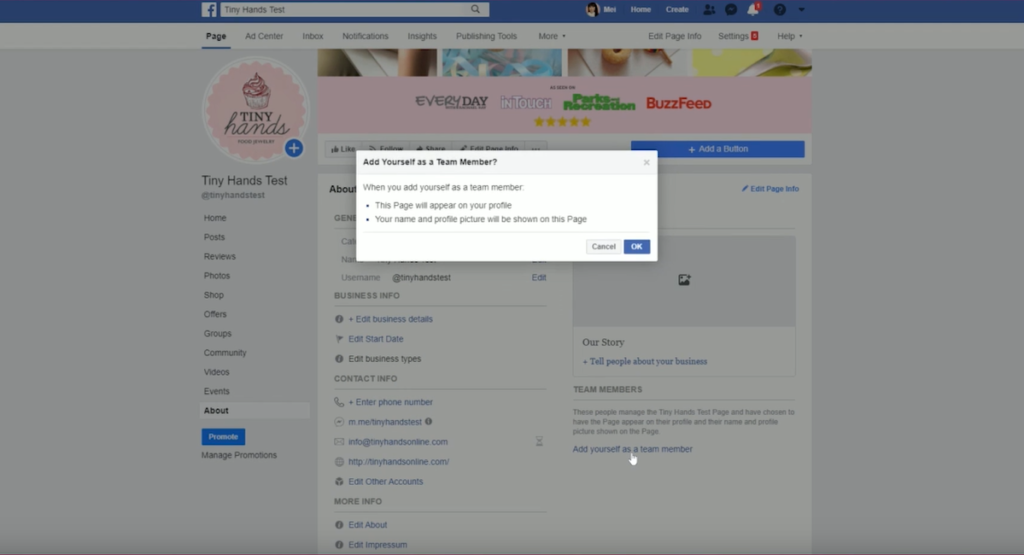
If you go to my Tiny Hands Facebook page (at @tinyhandsjewelry) you’ll see that I don’t have this information on there.
Fill in as much as you can, but don’t spend too much time trying to get everything right.
Your Call-to-Action Button
Another thing that I recommend for you to do is to edit the big blue call to action button. It’s a great place for you to get people to do something that you want them to do outside of Facebook. That could be to go to the shop on your website or to join your email list.
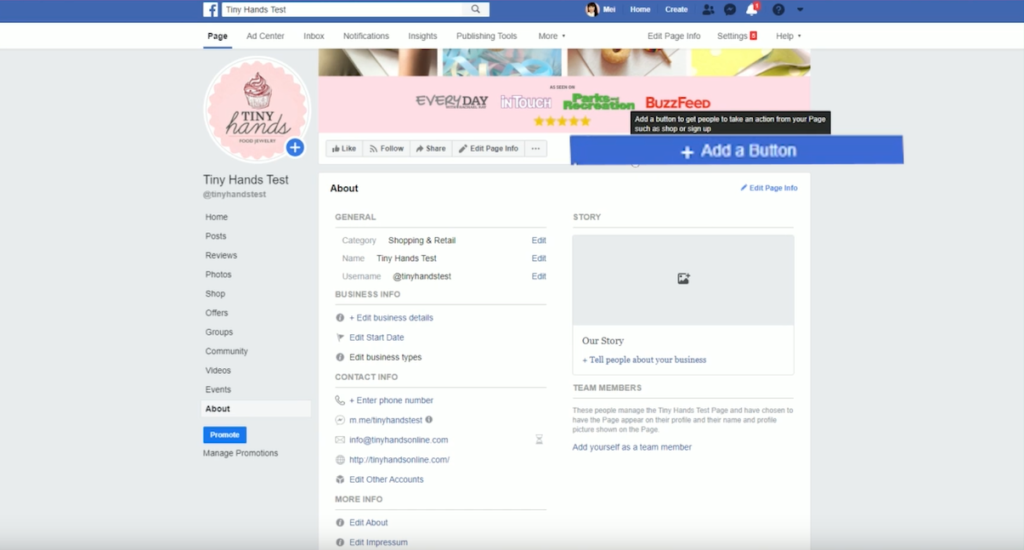
I always recommend that you get people through your email list first. It’s not likely that when people initially land on your website that they will order right away.
So get them to a landing page where they can enter in their email address and join your email list. They can get some sort cool thing like a coupon code, a free gift, or a PDF download – whatever incentive would make sense for your business.
When you click on the button, you’ll see that there are different options for your calls-to-action.
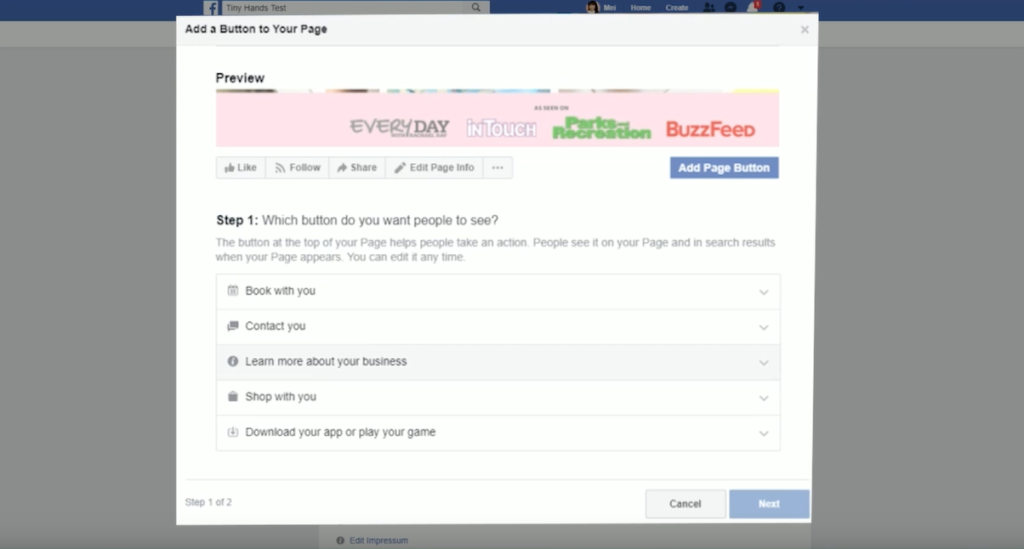
Some of these things are not going to make much sense for you. For example, book with you. This is more for coaches or service providers or consultants.
If you want people to join your email list, you can click on “contact you”. Then go to “sign up” and if you click “next” it will ask you for the actual link for where you want people to go.
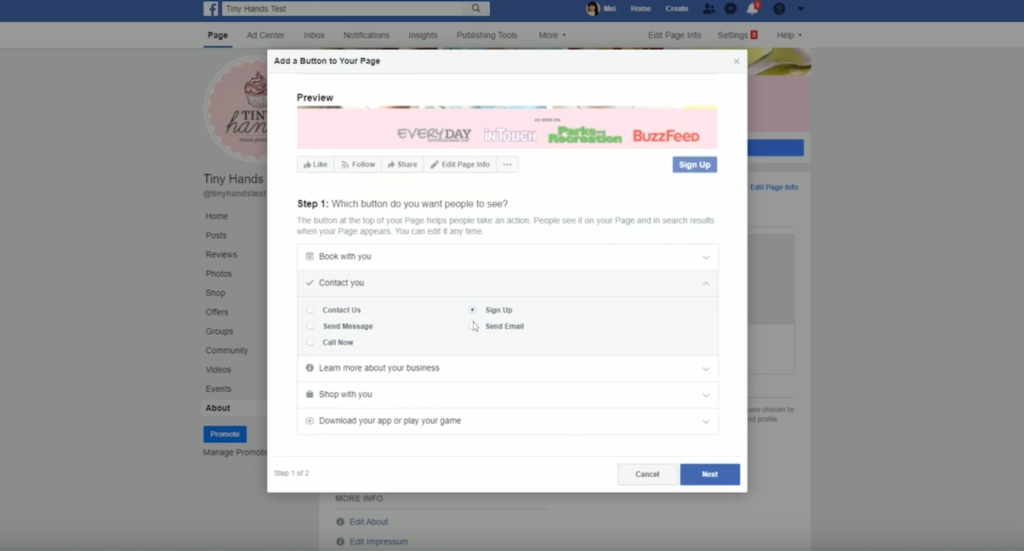
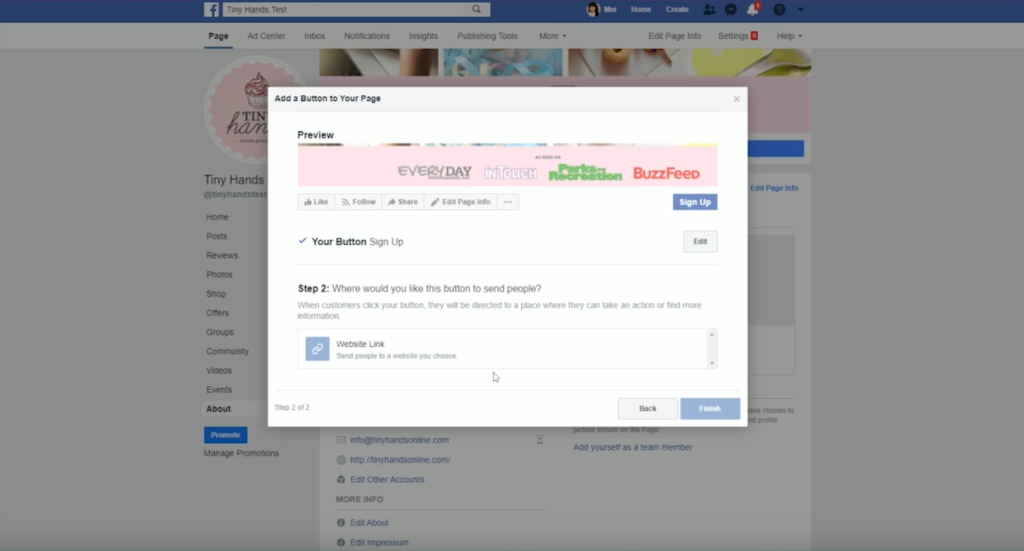
When you’re done, you can click on finish.
Now when people come to your Facebook page this button will say “sign up” and when they click on it, they will be direct it to your landing page URL.
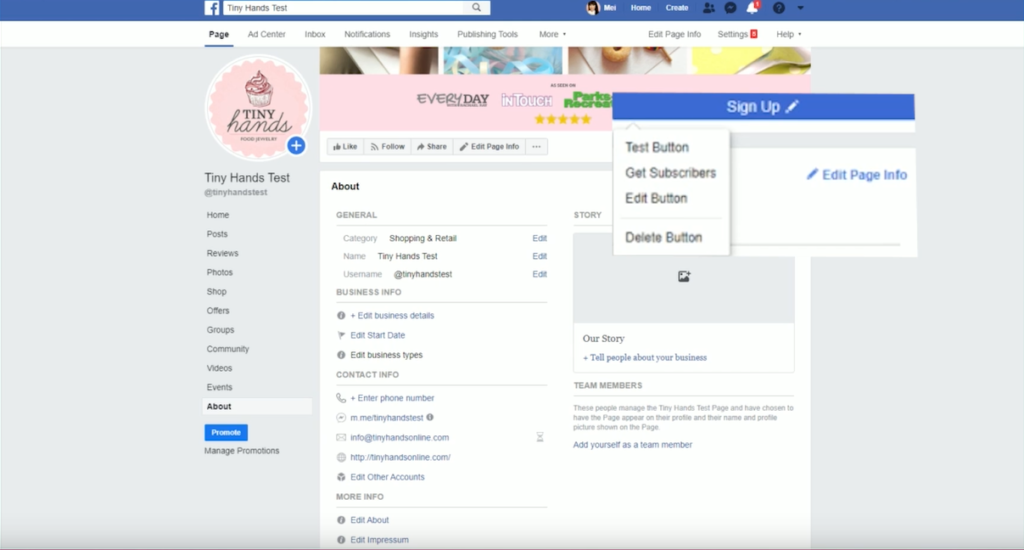
If you don’t want people to sign up for an email list, you can also just direct them to your shop. You can always edit this to shop with you and then put in the link to your website.
Settings
The settings on your page are mostly going to be administrative settings. This sets how people can interact with your page or whether or not you want to allow people to send you private messages.
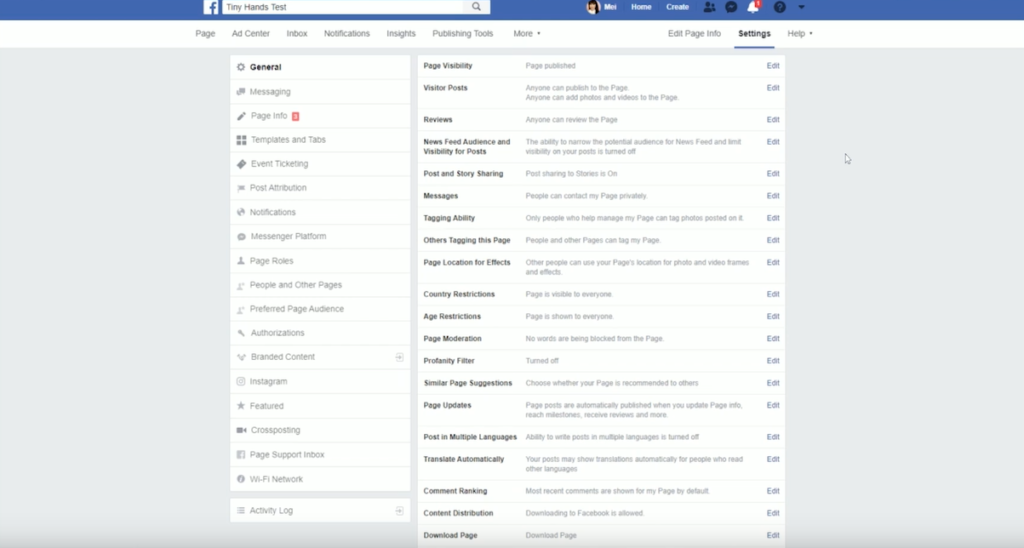
If you need to reconfigure something about your Facebook page, most things are going to be found through the settings link on the top right corner.
You can go through each of these settings in your own time. Don’t forget to go through each different tab on the left-hand side because they will show you their own set of different settings in each of these tabs.
I want to point out some important things that I think are going to be really helpful for you.
Messages
The first thing is going to be messages.
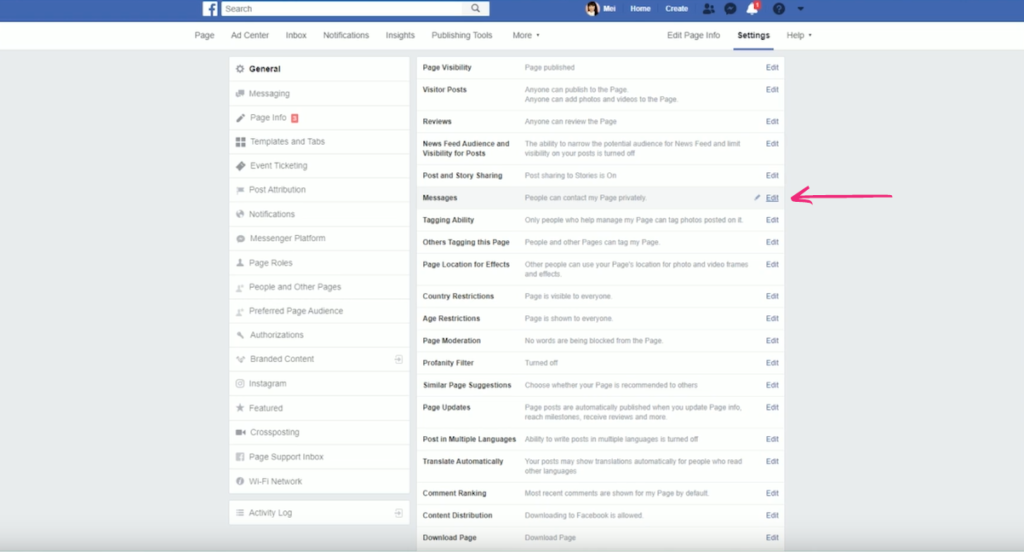
I think in the beginning, if your business isn’t super busy just yet you can keep this turned on. The problem starts if you have a lot of customers who are contacting you on, say, your email and then on Instagram Direct message and then Instagram comments and then Facebook private messages.
You can see how it starts to become overwhelming and a little bit cumbersome.
So with Tiny Hands Jewelry, I’ve turned it off to limit how people can contact me.
This method encourages customers to get off Facebook and actually send me a proper e-mail if they want to contact me. That way I can keep better track of people and help them better that way.
Merging Pages
If, for whatever reason, you already have a Facebook page or later down the line you want to actually merge two duplicate Pages.
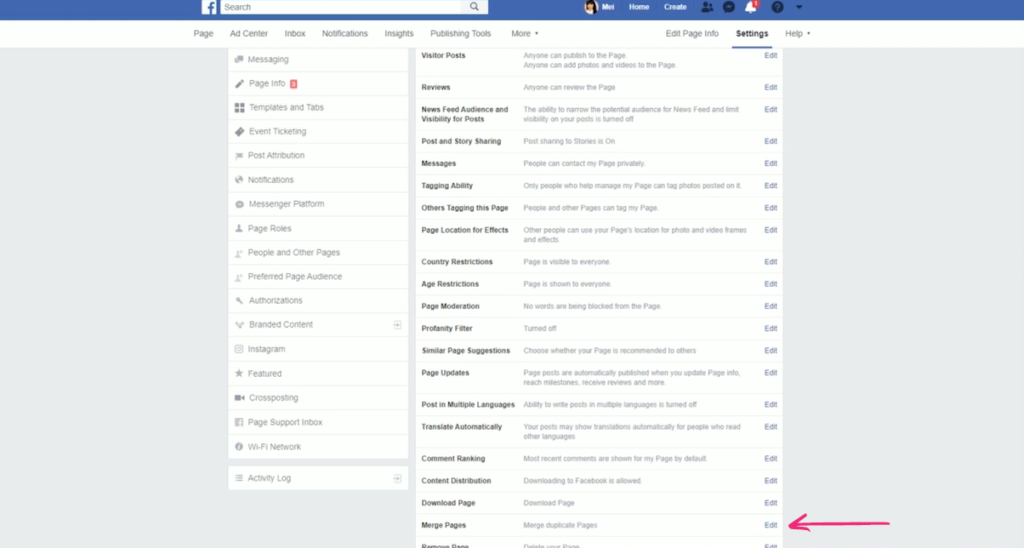
Say you’re doing a re-brand or you are renaming your business, but your business is essentially still the same just with a different name, then you could create a new Facebook page and actually merge the pages together.
This is going to be a manual process that goes through Facebook support staff.
Setting Up Page Links
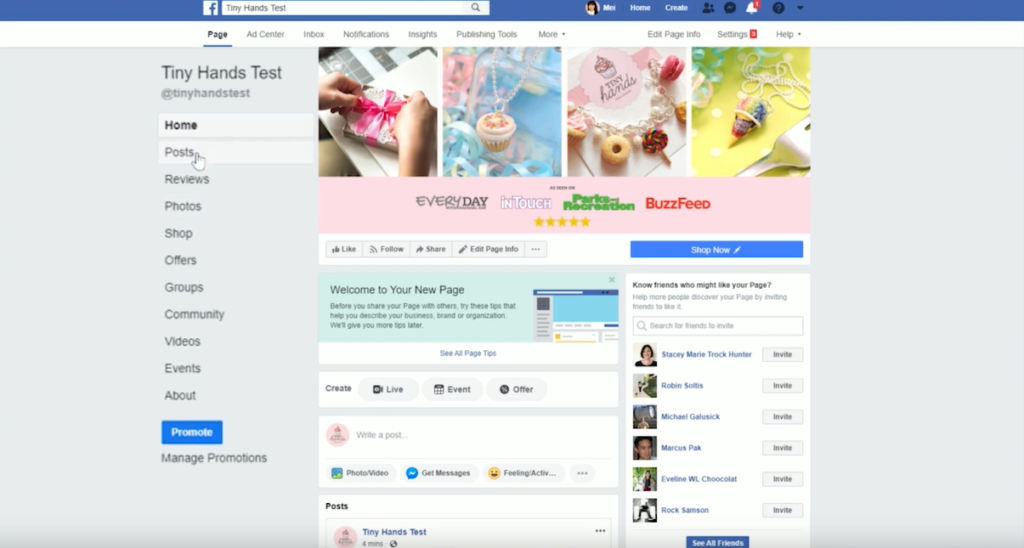
On the left-hand side, you will see that there are all of these links. You might be wondering how do you curate those links? And how do you add new links or change the information that’s showing on here?
That’s going to be under settings. Go to templates and then tabs. In the initial setup, we had chosen the category of our Pages to be a Shopping and Retail page. When you choose that, Facebook uses a sort of template.
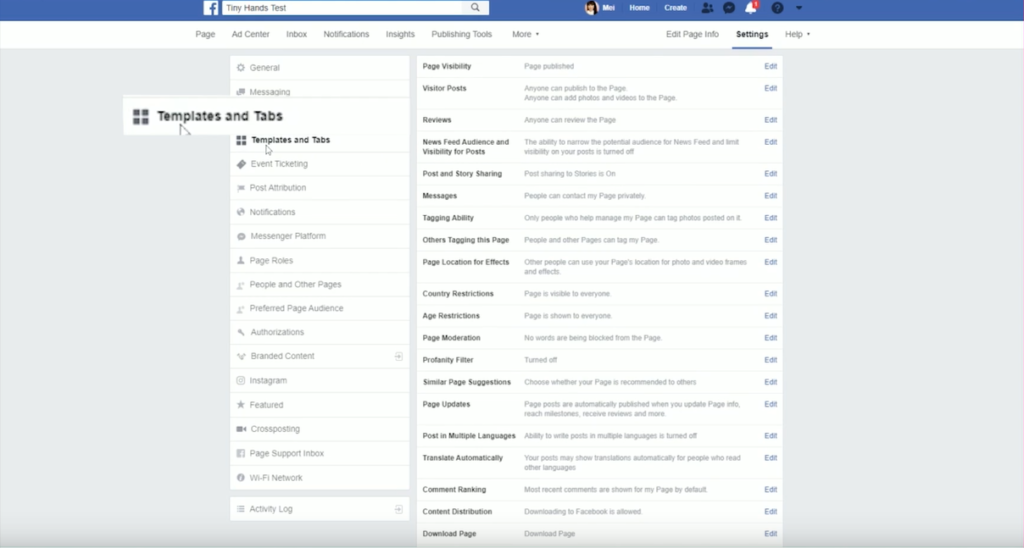
There are some things that you might not be able to turn off. So just kind of click around for and find the things you can change. You can also drag and drop these links to rearrange them. I might want shop right under photos, for example, and about right at the top.
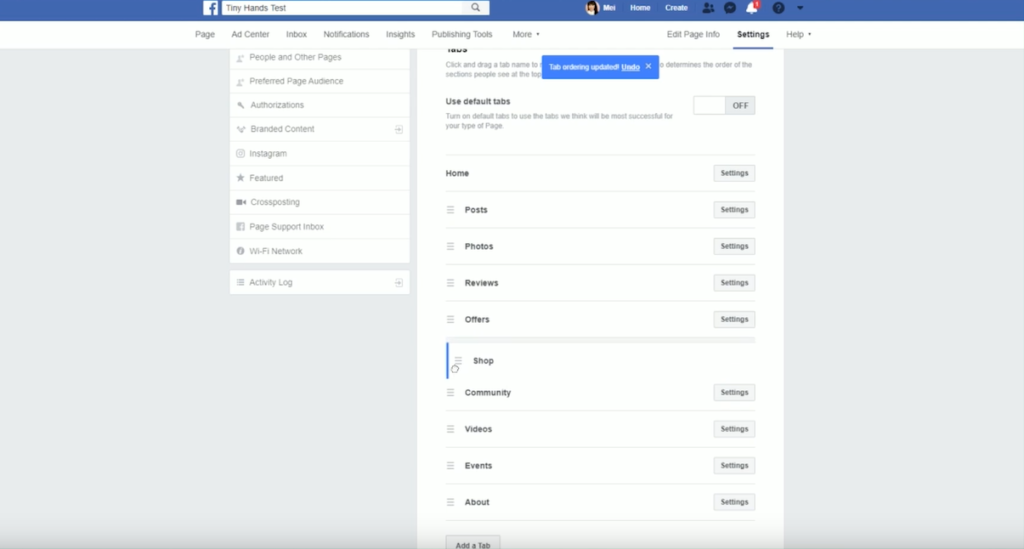
If you want to add a tab you can also do that at the bottom.
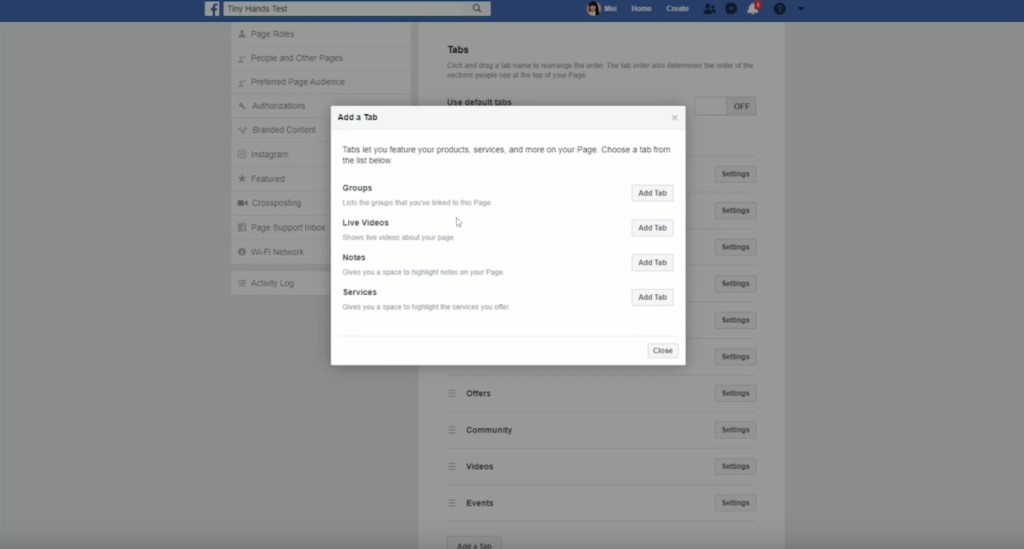
This is definitely a little bit more advanced, so I don’t recommend that you do this unless you really need to do something complicated with your Facebook page.
If you go to my Facebook for Tiny Hands, you’ll see that I have a tab for people to join my email list.
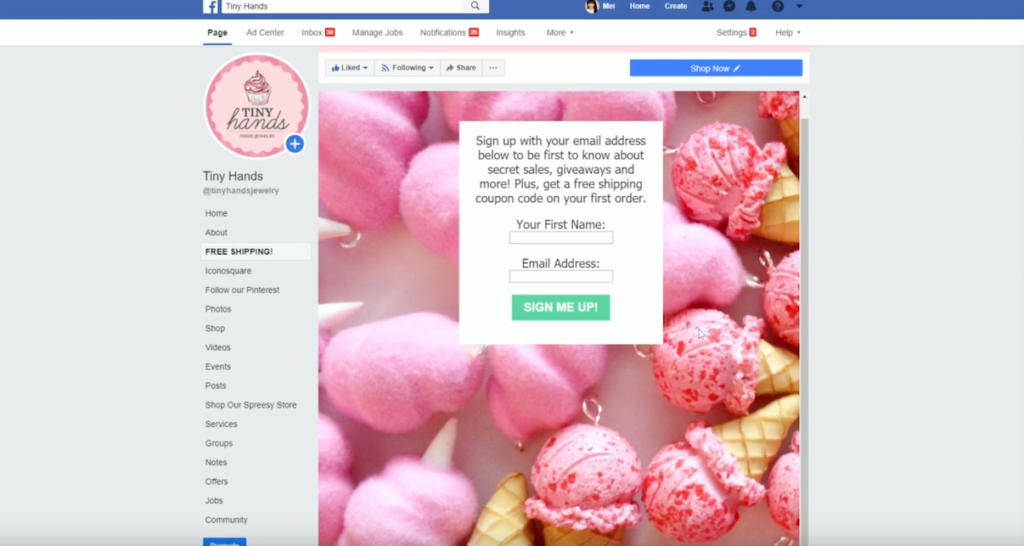
The way that I do that is with using an “add tab” and with using a third party app. I’ve also had to put in some code in there.
It is a little bit complicated.
If you’re just starting out, I don’t think it’s necessarily going to be worth it for you to slave away to try to figure out how to get that to work.

Notifications
The next thing I want to point your attention to is notifications.
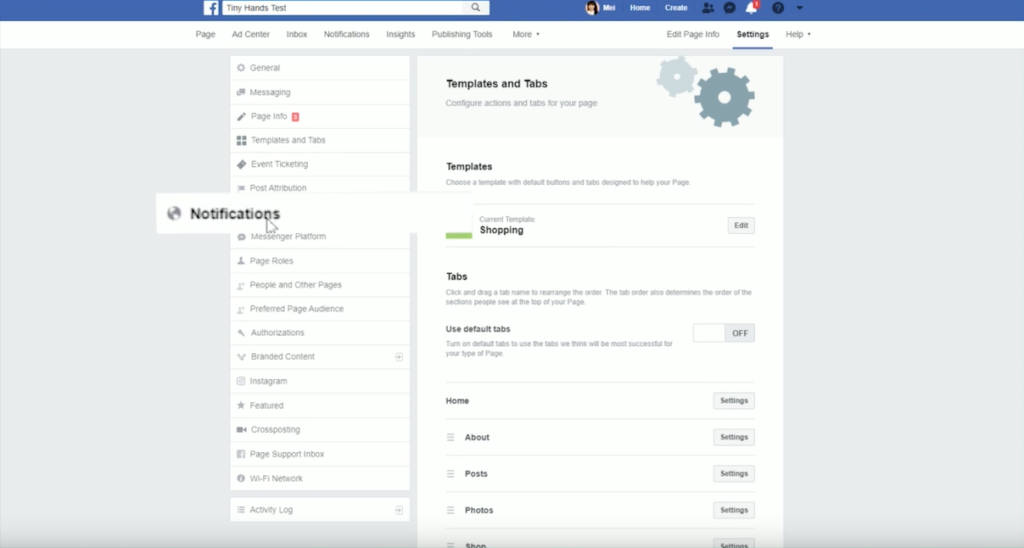
Here you can customize whether or not you will get a notification for an action. I do think that in the beginning that you try to keep as much of this turned on so that you can authentically engage with the people that are engaging with your page.
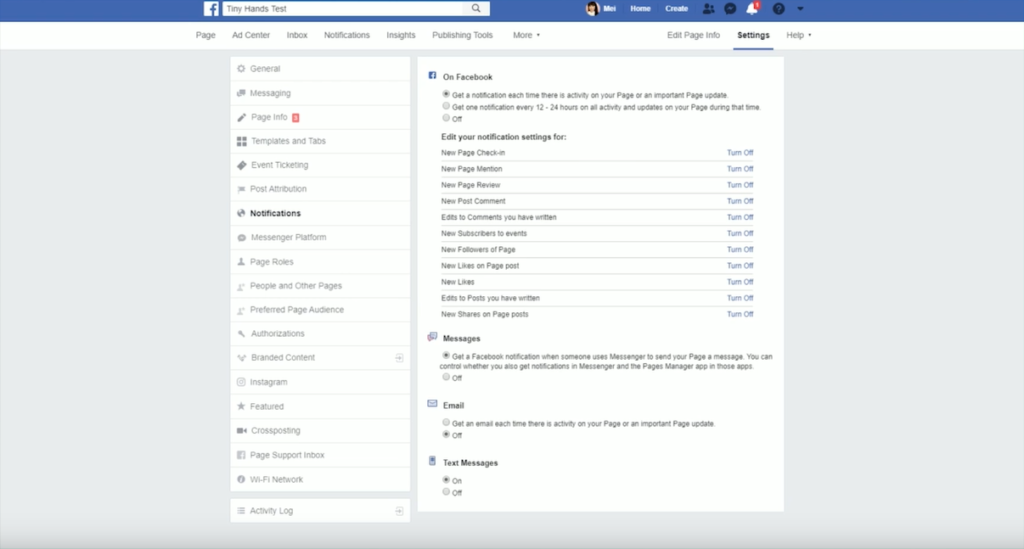
If you have these notifications turned off it may not be until days or weeks that go by before you notice that someone left that comment. By the time you want to respond to them, it might be too little too late.
So turn these things on so that if someone does leave a comment you can respond to them right away and that’s a great way to start building that new relationship with your new followers.
The next thing is to go down to Instagram.
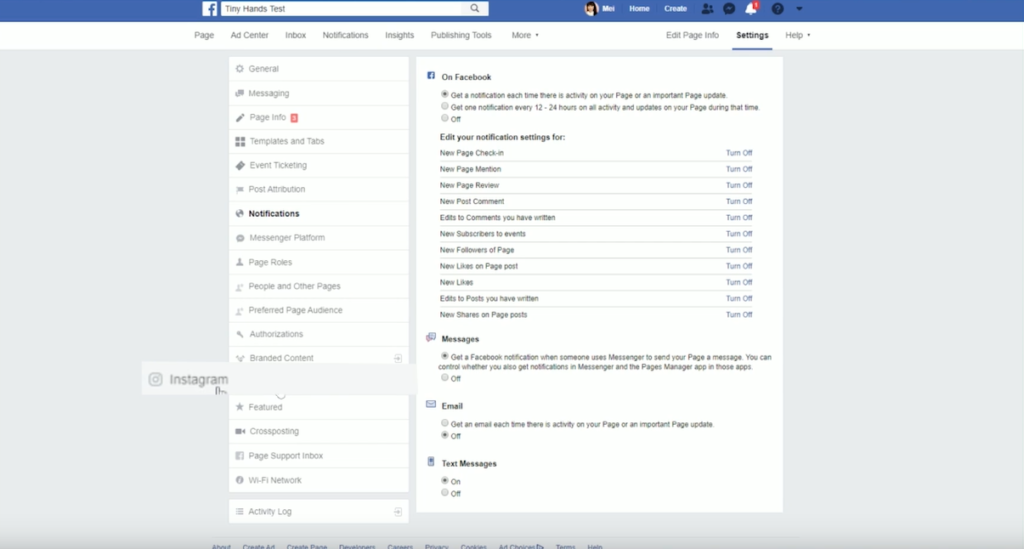
If you already have an Instagram profile, connect your account.
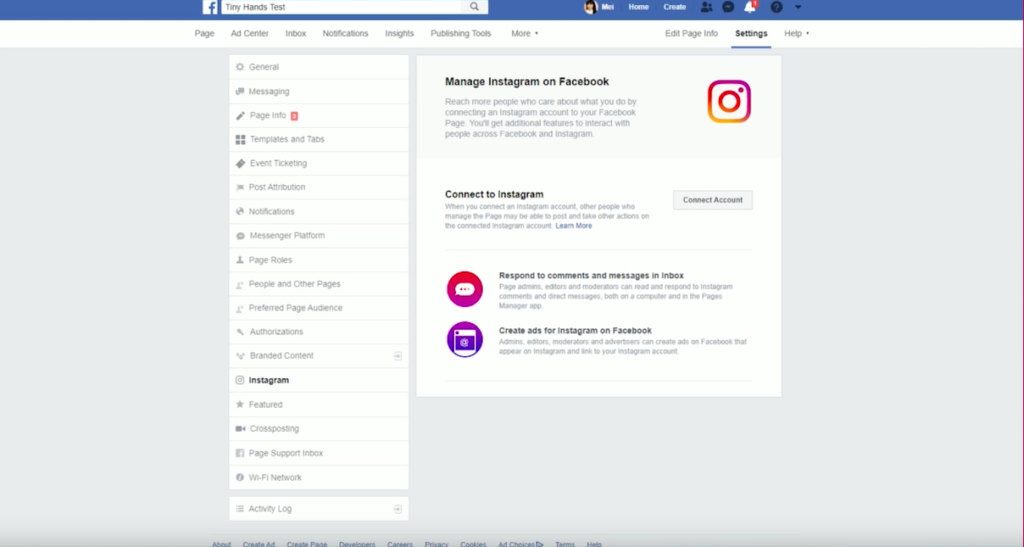
Once you click this button, it’s going to bring up a pop-up and it’s going to ask you to log in as your Instagram account.
Facebook owns Instagram, and if you ever want to do ads on Instagram, you’re actually going to have to do that on the Facebook platform.
It also consolidates comments and messages into one inbox on your Facebook. So you don’t necessarily have to check both.
Also, if you’re using apps like Planoly, there is a feature where you can auto post your Instagram content to your Facebook page. In order to use that feature, you have to have the two platforms connected.

Connecting Shopify
There’s a really easy way for you to get your products set up on your Facebook page if you’re using Shopify. People will be able to shop your products directly on Facebook without ever having to leave Facebook.
That’s really cool.
This is totally free to do with your Shopify plan. What I love about it is that you’re not requiring people to leave Facebook to go over to your website. Because it’s so easy and such a seamless experience, it actually encourages people to buy from you.
It makes sales easier for you to get.
Let me show you how to do that.
First, we’re going to go into the back end of your Shopify store. On the very bottom left corner, you’re going to see this link for settings. Click on that.
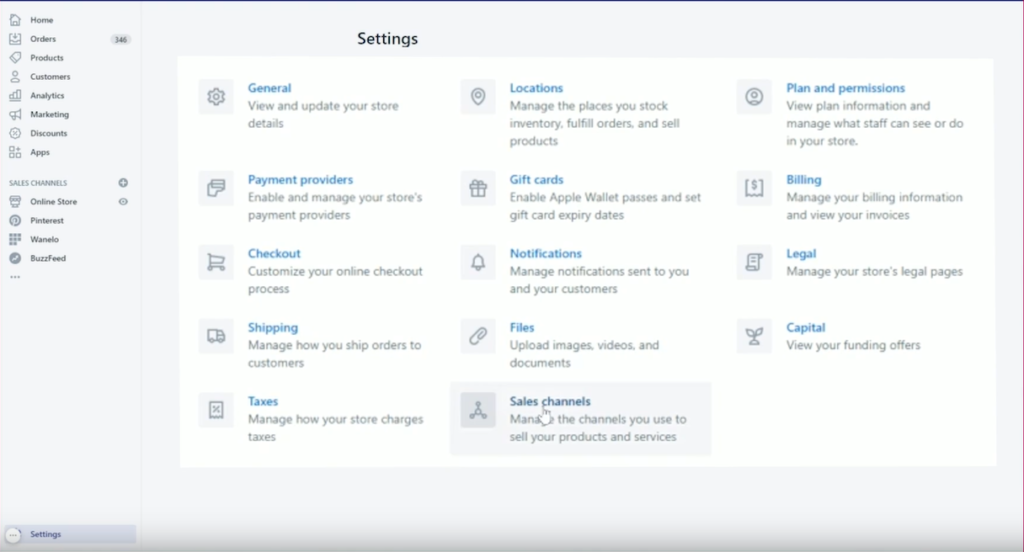
Then you’re going to click on sales channels. The beautiful thing about Shopify is that it integrates with so many different platforms. Whatever products that you have set up on your Shopify store page are automatically connected with those integrations.
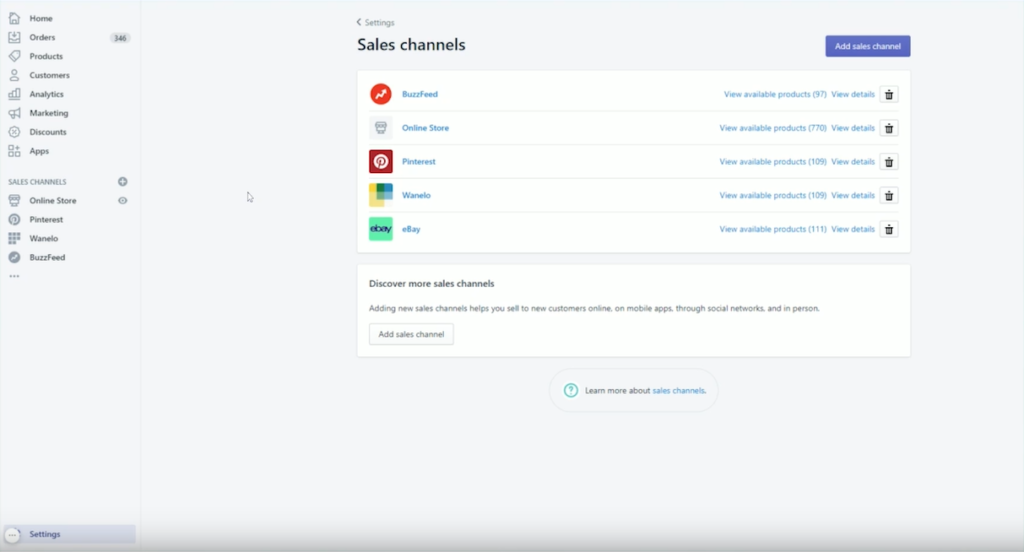
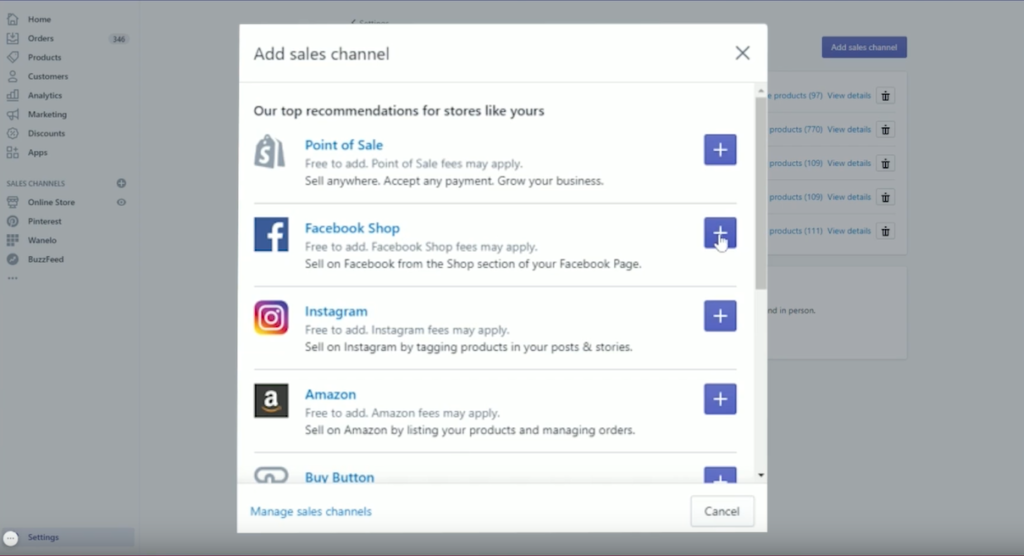
Click on the ad sales channel. This is where you setup your Facebook shop. Select the Facebook shop and click on the plus button.
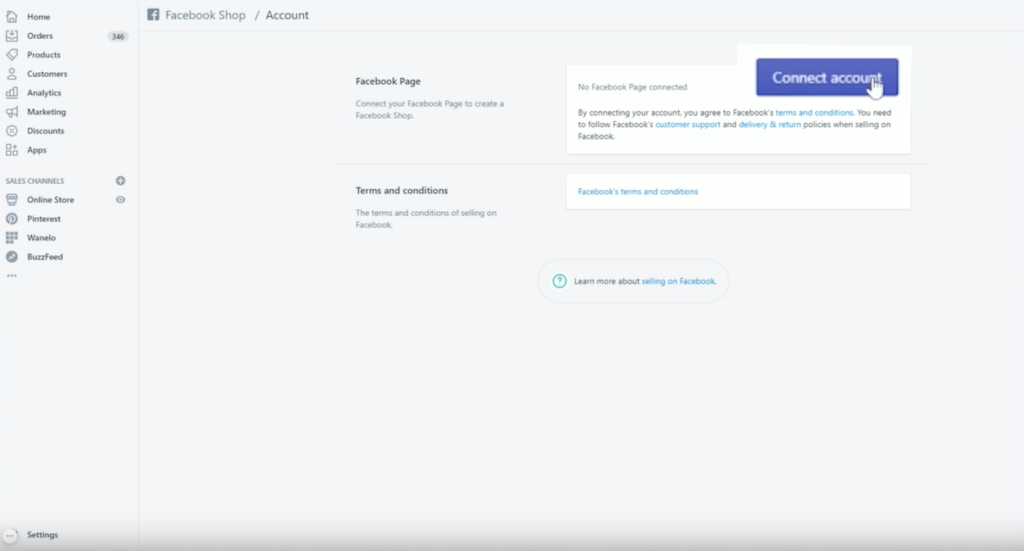
The next thing you’ll need to do is connect your Facebook page. There’s going to be a pop-up that appears. Just follow the prompts on the pop-up. When you’re done, this page will refresh.
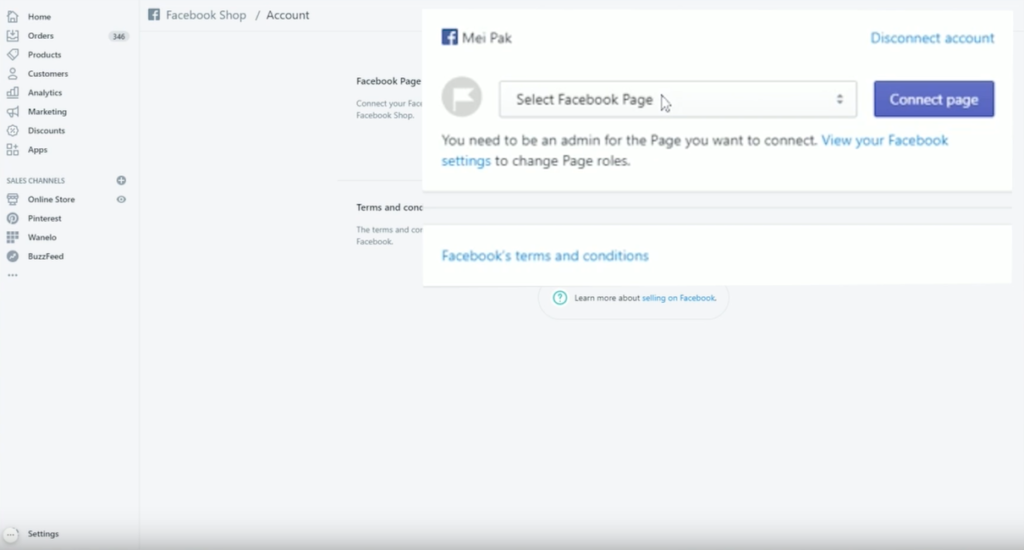
It will say this is the personal profile you’ve got connected and now you have to select your Facebook page. Click on connect page. Accept the terms and then you’re going to get this notice that says that it will take up to 48 hours for Facebook to review your shop just for them to make sure that the products are selling are not against Facebook’s terms of service.
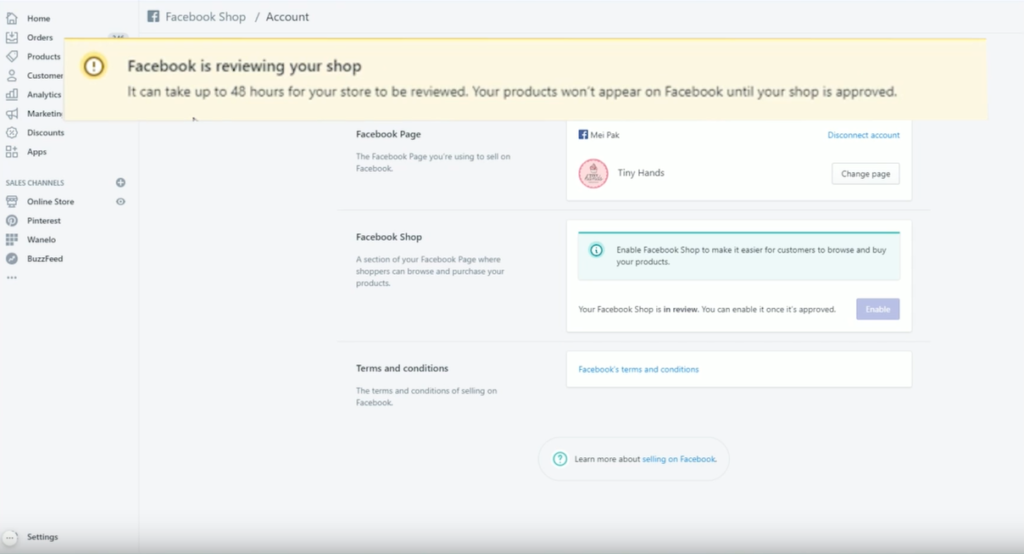
If you sell weapons or potential sporting goods, like bows and arrows that might be deemed as weapons and Facebook may not be so keen on you having your products on Facebook. You can still have a Facebook page that you do organic marketing to but it just might be a bit of a problem for you to sell your products directly through Facebook.
After that 48 hours is over and once you’re approved, you’ll see something that looks like this. You’ll see all of these other sales channels.
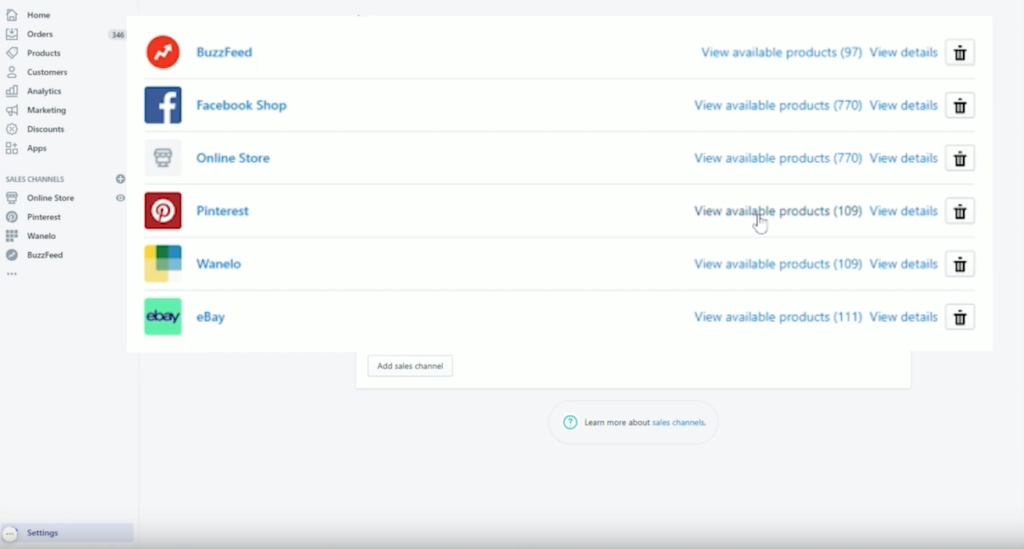
Let’s look at my Pinterest Channel. I’m going to click on available products.
So you can see all the products that I have for sale on Pinterest.
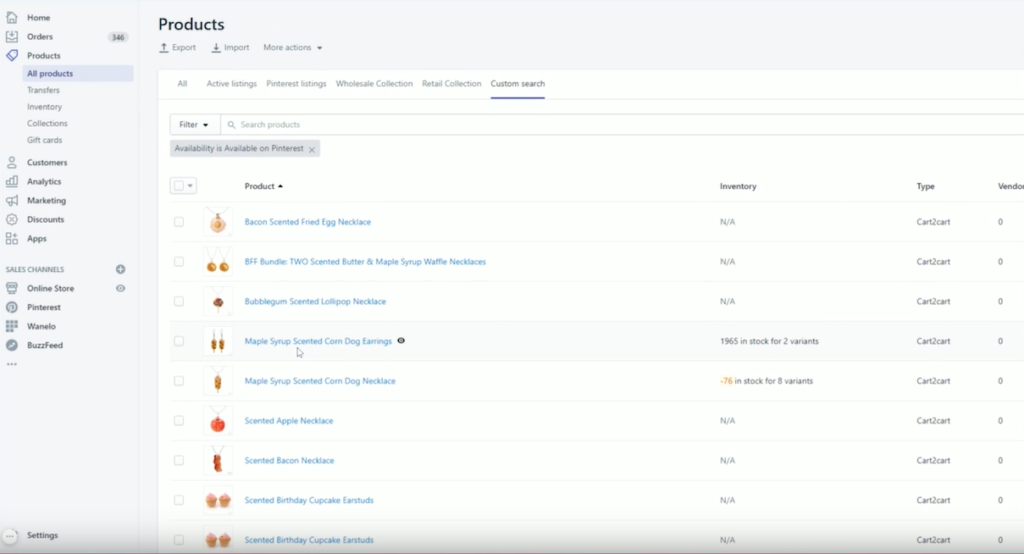
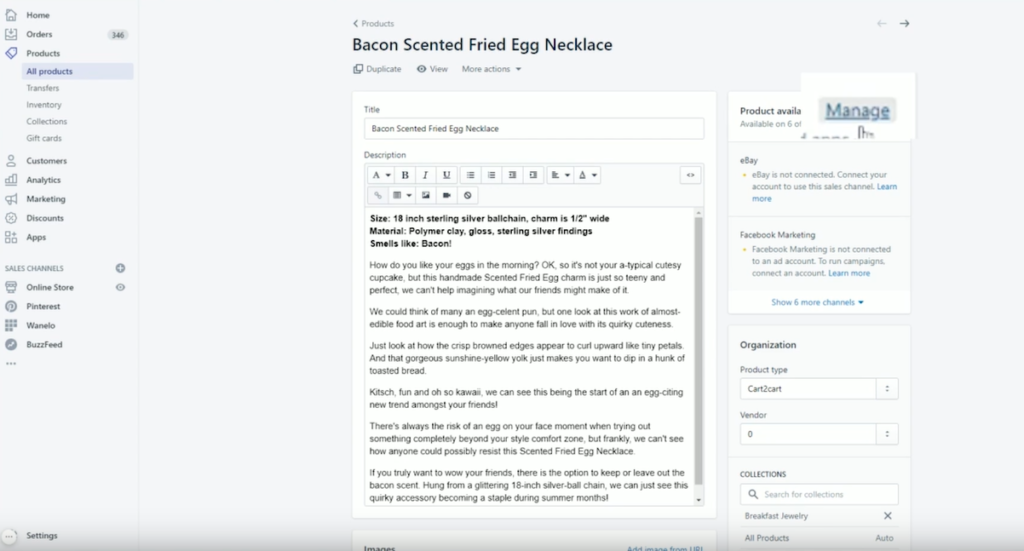
If I click on one of these products I can actually control which products get put on my Facebook page shop by going over to the manage button under product availability. You have the option to toggle this on and off.
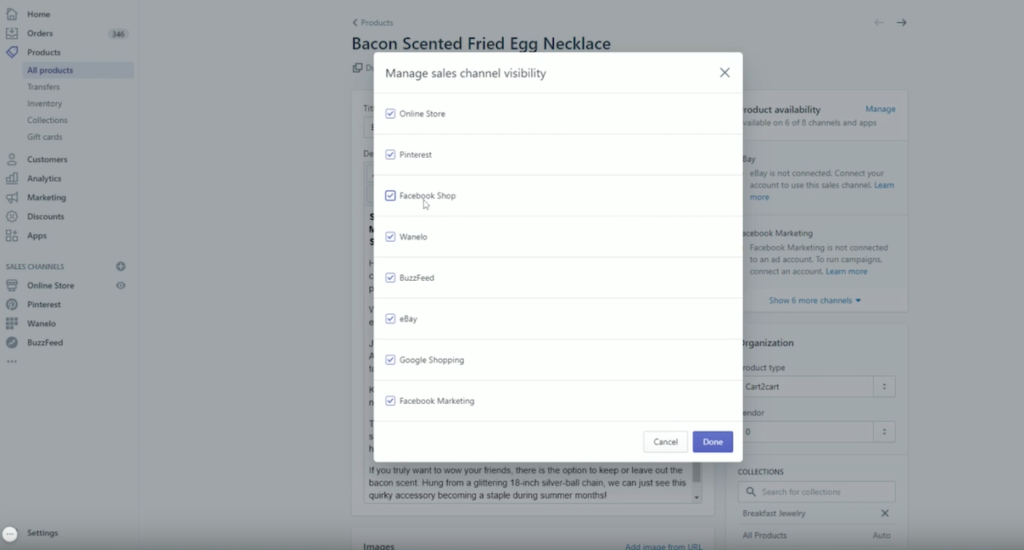
Here’s an example of why you might do this. I have a Bomb Pop Necklace. A bomb pop is a popsicle, but I think because of the word bomb it kind of goes against terms of service with some of the social media platforms.
Facebook will tell you that these products did not qualify after going through the review process which means that you’re not allowed to sell those particular items.
For some of these products you might actually want to just create duplicate item and change some of the wording. Like instead of calling it a Bomb Pop necklace, I could call it a popsicle necklace.
As you grow your page and make sales on your Facebook page, those sales will actually show up in your Shopify admin.
Even things like handling your shipping, printing shipping labels, or sending out email marketing to people, all of that is all connected into one space.
That’s amazing!
Once your business starts to grow, it becomes more important that your work becomes seamless, smooth flowing, and efficient.
As always, if you have any questions for me about how to do Facebook, leave me a comment below.
Leave a Comment
Liked this article? Share it!
Unlock a Profitable Handmade Business
in Just 12 Weeks Without Using Etsy
or Social Media
FREE WORKSHOP
This workshop is for anyone who makes and sells a handmade or physical product, including jewelry designers, artists, paper designers, bath & body product makers and more!
What You'll Discover
The #1 mistake people make with Etsy & social media that causes shops to FLOP
The secret to making it with your handmade shop so it's no longer just a hobby
How to make sales in your handmade shop with ease so you can finally get to 6-figures
TAKE ME THERE
Your email address will not be published. Required fields are marked *
Leave a Reply Cancel reply
About
Blog
A Sale A Day
Student Login
Free Class
Contact
Terms
Become A Student
Watch On YouTube
Student Reviews
See My Handmade Shop!


[…] Source: https://www.creativehiveco.com/how-to-set-up-a-facebook-business-page-for-your-handmade-business/ […]